Blade Ball Sword Tier List 2026: Ultimate Guide to the Best Weapons
The world of Blade Ball in 2026 has become even more competitive, with dozens of new weapons added to the game's arsenal. Many players are still r..
Blade Ball is one of the most mechanically demanding PvP games on Roblox. What started as a simple deflection game has evolved into a high-skill arena where victory depends on physics manipulation, frame-perfect inputs, ability synergies, and psychological warfare. With the V13.6 April 2026 update reshaping the meta, this complete guide breaks down everything you need to dominate — from core mechanics to pro-level mind games.
| Game Title: | Blade Ball |
|---|---|
| Game Genre: | Adventure / Action |
| Difficulty | High |
| Game Mode | PvP |
| Platform | PC, Mobile, Console |
| Session Length | 5–15 min |
| Age Rating | 6+ |
| Multiplayer | Yes |
| Donate (Robux): | Optional |
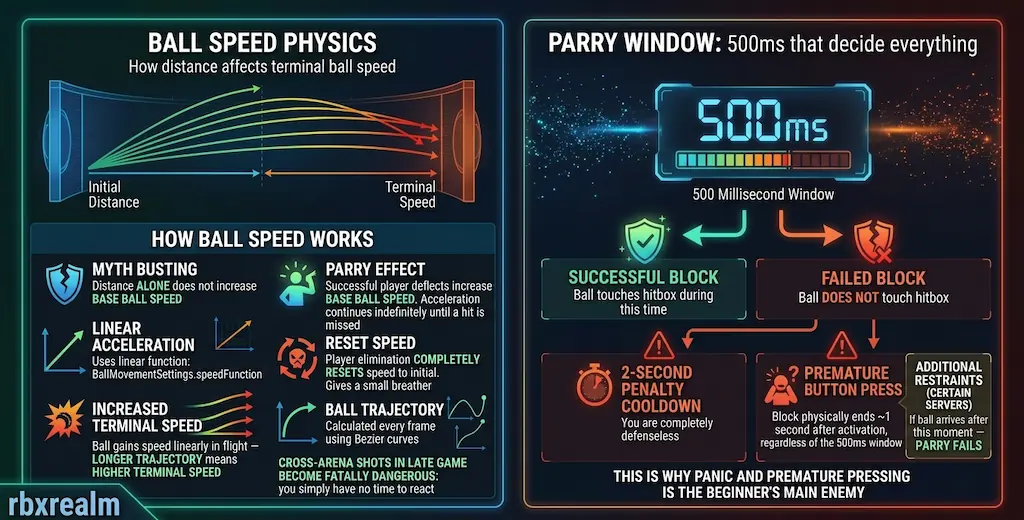
One of the most common misconceptions in Blade Ball is that physical distance directly multiplies the ball's speed stat. This is incorrect. The game governs ball velocity through a specific linear function embedded in its code: BallMovementSettings.speedFunction.
What actually happens: the ball gains speed linearly over the time it spends traveling. The longer the flight path, the higher the terminal velocity at the moment of impact. This is why cross-arena volleys in late-game rounds are so deadly — by the time the ball reaches you, it has accumulated far more momentum than a point-blank return, and your 500ms reaction window effectively shrinks to almost nothing.
Every successful parry increments the ball's base speed. This acceleration is indefinite until a player is eliminated, at which point the speed resets completely to baseline for all remaining players.
The ball's trajectory is recalculated every single frame using parametric Bezier curves — quadratic or cubic — ensuring smooth target tracking without jagged directional snapping.
When you press the block input, the server opens a rigid 500-millisecond defensive window. The game engine continuously checks whether the ball intersects your expanded parry hitbox during this period.
Miss that window — whether by pressing too early or too late — and you receive a brutal 2-second penalty cooldown, leaving you completely defenseless. In high-speed server environments, a secondary mechanic also causes the block animation and its collision detection to fully expire after approximately 1 second regardless of the 500ms window. If the ball arrives after this expiry, the parry fails.
The biggest mistake beginners make: panic-clicking the block button the moment they see the ball coming. At high speeds, this almost always results in a wasted window and guaranteed elimination.
Of course, perfect timing and the right strategy are the keys to victory, but dominating the arena is much more fun with cool sword skins and explosion effects. To quickly grab free coins, spins, and exclusive items without the grind, make sure to check out our constantly updated list of active Blade Ball codes. We test them daily so you never miss out on free rewards!
Blade Ball runs across PC, Console, and Mobile — and these platforms are not created equal.
PC is the mathematically superior platform. It offers the lowest absolute input delay, supports 120Hz+ refresh rates, and allows dual-keybind setups for maximum manual CPS. Tools like Bloxstrap or Fishstrap can unlock uncapped FPS through Fast Flags, eliminating frame rate bottlenecks entirely.
Console (PS5, Xbox Series X) supports 120Hz modes, significantly reducing input delay compared to older hardware. The main disadvantage is thumbstick camera control — performing the rapid 180-degree flicks required for advanced Curving technique is noticeably slower than a mouse.
Mobile has the highest and most variable input delay of the three. Fingers covering parts of the screen block critical visual indicators, including the red target flash. The recommended approach is customizing the UI layout to place the block button in an ergonomic resting position and using a claw grip to separate movement, camera, and parrying into distinct physical actions.
Regardless of your device, these settings separate casual players from competitors:
After a successful parry, you can directly control the ball's exit trajectory using your camera angle at the exact millisecond the parry registers. This is one of the most important offensive skills in the game.
Dotting is your aggressive, high-velocity shot. Flick your camera sharply upward or aim directly at your target's center mass the moment you click. This sharpens the Bezier curve calculation, forcing the ball onto a direct linear path with maximum terminal velocity. Your opponent gets minimal reaction time.
Curving is your deception tool. Look sharply away from the target — or directly behind your own avatar — at the moment of impact. The ball will momentarily travel in the wrong direction, arc wide, and only then re-orient toward the target. This deliberate delay disrupts your opponent's rhythm and frequently causes them to burn their parry window early.
The key to mastery is unpredictable alternation. If your opponent can read your pattern, they can adapt. Keep them guessing by mixing both techniques throughout the rally.
A clash occurs when two players are at close range and the ball bounces rapidly between their intersecting parry hitboxes. At this point, trajectory and positioning become irrelevant — it reduces purely to input speed.
The critical competitive fact: Blade Ball has no CPS cap on hit registration. Because the server registers inputs as fast as the client sends them, auto-clicker software dominates this mechanic. A macro set to 0ms delay guarantees a mathematical win against any human opponent in a prolonged clash.
For players competing without macros, the mandatory alternative is Dual-Binding: assign the block command to two separate keys (Left Mouse Button and F, for example) and spam both simultaneously. This effectively doubles your manual CPS.
Timing your clash entry is equally critical. Starting your CPS spam from a distance causes your 500ms windows to overlap incorrectly with flight time, eventually generating an accidental penalty cooldown on yourself. The correct approach is the Force Clash: physically move directly into your opponent's character model before activating your CPS spam, reducing ball flight time to zero and locking them into a mechanical contest they are unlikely to win.
The average human reaction time is around 200ms. The parry window is 500ms. This relationship breaks down completely once network latency enters the equation.
Players with low ping (under 40ms) can parry reactively based on the visual trajectory of the ball, clicking just before it reaches their avatar.
Players with high ping (100ms or above) need a different strategy: predictive buffering. Press the block button the instant your UI indicator turns red — buffer the input early to account for server delay. High-ping players should also lean heavily on Curving to slow the ball artificially, since surviving fast linear volleys requires hardware responsiveness they cannot achieve.
Enable Shift Lock ("Classic Keyboard Mouse" camera mode) during active combat. This binds your character's facing direction to your mouse, allowing lateral strafing with A and D without losing visual contact with the ball.
Free Camera (Shift Lock off) has a specific advanced use: scanning your surroundings and identifying vulnerable opponents without turning your avatar. Since turning your avatar changes the ball's calculated exit trajectory, Free Camera lets you gather spatial intelligence while maintaining your defensive posture.
Positioning matters more than reflexes at high levels. Stand toward the outer perimeter of the arena to maximize the ball's travel time toward you, giving you the largest possible reaction window. Use deliberate movement to bait opponents — edge slightly toward the center then immediately retreat to force ability burns from aggressive players.
Abilities define the flow of every match. After the V13.6 update, the meta has centralized around abilities that aggressively manipulate the physics engine or shut down enemy counterplay entirely.
Gale's Edge — Captures the ball in a gust of wind, allowing you to instantly launch it at a target with Q. Completely bypasses traditional parry timing. Dominant in all modes.
Slashes of Fury — Halts the ball and charges it with multiple slashes before launching it at terminal velocity (estimated 2,000+ mph). Humanly impossible to block without a pre-emptive defensive ability.
Quantum Arena — Generates a localized void that disables all enemy abilities inside it. Devastating in team modes for area denial and securing cluster eliminations.
Infinity — Locks the ball in place on impact, making you immune to high-speed trajectory mix-ups. The premier defensive choice for chaotic FFA endgames.
Golden Ball — Passive: prevents ball respawn after an elimination and grants a 15% speed buff per kill. Creates an unstoppable snowball effect in large lobbies.
Forcefield — Automatically deflects the ball for a set duration. Essential against aggressive targeters and a hard counter to Slashes of Fury.
Titan Blade — Greatly increases your physical parry hitbox. Compensates for positioning errors and network latency. Viable across all modes.
Encrypted Clone — Spawns an AI bot that returns the ball exclusively to you. Outstanding for stalling enemy ability cooldowns and controlling match tempo.
Freeze — Halts the ball for up to 5 seconds. Useful for resetting the visual tempo of a rally. Becomes powerful in combination with Infinity: wait 2–3 seconds after the opponent activates Infinity, then trigger Freeze to trap the ball as their invulnerability window expires.
Thunder Dash — Directional teleportation. Good for escaping Force Clash attempts or sudden repositioning, but outclassed by higher-tier mobility abilities.
Pull / Telekinesis — Once considered overpowered. Now highly predictable against experienced players who rely on UI indicators rather than visual ball tracking.
Quad Jump / Platform — Verticality offers minimal strategic value. Airborne players are easily read and punished with upward Dotting.
Knowing the tier list is not enough. You need specific tactical responses to defeat players using top-tier abilities.
Countering Infinity: Maintain maximum distance to preserve the ball's flight time. The optimal hard counter is Freeze — wait exactly 2–3 seconds after Infinity activates, then trigger Freeze to trap the ball as the invulnerability expires. Never try to predict the click; wait strictly for the visual cue of the ball physically moving again.
Countering Pull and Telekinesis: Stay at extreme distance to force them into engaging with a long-travel-time ball. Forcefield is the active counter — activate it when a Telekinesis activation is suspected and the automatic deflection punishes the attacker severely.
Countering Slashes of Fury targeters: Traditional parrying is mathematically impossible against a fully charged shot. Your only viable options are evasive abilities like Thunder Dash to create instant distance, or pre-emptively activating Forcefield to absorb the impact automatically.
Once mechanics are mastered, elite gameplay shifts heavily into the mental layer. Victory means manipulating attention, breaking rhythm, and conditioning the opponent to expect the wrong thing.
At intermediate levels, players track the physical ball render across the screen. At pro levels, the ball moves far too fast for ocular tracking. The correct approach: lock your FOV to 50, fix your gaze on your own avatar's center mass, and click the exact millisecond your character model flashes red. This is far more reliable than chasing the ball visually.
Secondary awareness: when the ball switches targets, that player immediately turns red with a white outline. Track these UI indicators across the arena to predict incoming threats before they become lethal.
Physical character movement is used to waste the opponent's 500ms parry window before the ball even arrives.
Normal Headfake (against passive opponents): Look in the opposite direction of where you're actually sending the ball. A passive player tracking your camera will adjust and block early — in the wrong direction.
Reverse Headfake (against aggressive targeters): Move and look in the exact same direction. An opponent who is hyper-focused on your movements expects a fake and overcorrects, missing the real shot completely.
Advanced Conditioning (The Fake Reverse): Repeatedly use the Reverse Headfake until your opponent is conditioned to expect it. Then, in the deciding rally, execute a Normal Headfake. The opponent, expecting your camera to match your movement, turns the wrong way and cannot recover.
Against relentless targeters, never engage in a stationary clash. Retreat constantly, use Curving to slow the ball, route toward environmental hazards or clustered opponents, and force the targeter to expend abilities chasing you across the arena.
"Just play more" is not a training strategy. Improvement requires a controlled environment — the in-game Training Mode or Private Servers, both of which give free access to all max-level abilities for testing.
Phase 1 — Easy AI: Timing Calibration. Set bots to Easy. Easy bots frequently miss parries and never initiate clashes. The objective is not to win — it is to practice clicking as late as physically possible before the ball hits. This embeds the exact boundary of the 500ms window into your muscle memory. Also practice wall parrying drills near arena boundaries to understand how environmental collisions affect Bezier curve trajectories.
Phase 2 — Normal AI: Rhythm and Strafing. Elevate to Normal bots and focus on sustaining infinite rallies rather than quick eliminations. During extended volleys, practice the First Strafe / Second Strafe sequences, alternating between Normal and Reverse Headfakes. Observe how camera angle changes affect the ball's exit curve in real time.
Phase 3 — Expert AI: Clashing and Ability Counters. Set to Expert. These bots clash correctly and actively evade spam attempts. Practice Force Clash entry — close distance rapidly with Thunder Dash or Phase Bypass, then immediately engage dual-keybind spam. Simultaneously practice popping Forcefield exactly as the bot initiates an offensive push, developing instinctive counter-play timing.
Phase 4 — Extreme / Impossible AI: Reaction Ceiling. Set to Extreme or Impossible. These bots have zero-latency reaction speeds and are designed to win nearly all close-range clashes. Lock FOV to 50, stare at your avatar, and click on the red flash only. Survive ten consecutive volleys against Extreme AI without abilities and you are mechanically ready for high-Elo competitive servers.
Blade Ball rewards players who understand the system, not just those with fast fingers. The 500ms parry window, Bezier curve physics, ability synergies, and psychological fakeouts form a layered competitive framework that takes time to fully internalize. Use this guide as your roadmap: start with timing calibration in Training Mode, master Curving and Dotting, learn the ability meta, and develop the mental game that breaks opponents before the ball even leaves your side of the arena.
The world of Blade Ball in 2026 has become even more competitive, with dozens of new weapons added to the game's arsenal. Many players are still r..